

about me

About Me

- Tezza
- Adelaide, Australia
- I am a fulltime Mum of 2 kids, I work part time and play with psp in my spare time. Ive been psp-ing now since 2007. I started with digital scrapbooking, then tagging in 2008, and designing in 2009. In 2010 I started writing scripts and found my calling (and addiction). You will find all kinds of freebies here on my blog, from tag/scrap templates, to kits and scripts. You can read my Terms Of Use by clicking the page up above too.. Thanks for taking the time to stop by.
blinkie

My Blinkie

i sell at

I Sell At


script test

I script test for


licenses

My Licenses


free sites

Free Sites


top sites

Top Sites


Saturday, July 17, 2010
I have started a new service designing custom blinkies and banners. I have a whole new blog dedicated to them called Tezzas Blinkies and Banners. Feel free to go over and take a look around. There are some examples of blinkies on there.
Today I have written my very first tutorial. I have written this with detail for newbies out there, so hopefully there is enough information here for you, for the psp pros out there, hopefully I dont bore you, lol. Feel free to comment if you think I need more or less, as I mentioned, this is my first. :)
So this tutorial was written by myself in pspx2, and those with a knowledge of psp should be able to apply it to other versions. If this tutorial resembles any others out there, its purely by coincidence.
I have used my own kit for this tutorial and I will post the details at the end of the tutorial.
Here it is:
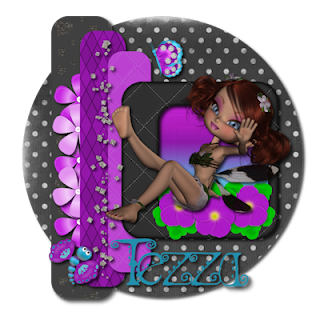 To start:
Open a transparent canvas 800 x 800 pixels.
Select your elipse tool – circle - width 10
Open Bg 23 and set as your foreground and background texture at scale 100%
Draw out your circle and center it.
Convert layer to raster layer
Select your rectangle tool – width 10
Open Bg 17 and set as your foreground and background texture at scale 50%
Draw out your rectangle approx 150 pixels wide and 700 pixels height (if you have your rulings set on your screen, if not, just estimate)
With your tool on the top left corner, drag the marker down until you get a nice rounded corner.
Convert to raster layer.
Place on top of your circle to the left showing some edge of the circle.
Apply drop shadow – mine is set as black, 75% opacity, blur 10, vertical and horizontal both 5 (I will keep these as my settings, you can set your shadows as you like)
Open Bg 7 and draw out another rectangle with the foreground and background set at 30% as above, but half the width and shorter in length.
Convert to raster layer. Place on top of your first rectangle. Apply drop shadow.
Open Bg 16 and repeat the process with foreground and background set at 75%.
Open frame 4, copy (ctrl c) and paste (ctrl v) into the center of your circle – moving it to the right so it’s overlapping your top rectangle, apply drop shadow.
Select your square tool, Open Bg 20 set as foreground and background at 75% and draw out a square the size of the inside of the frame.
Convert to raster layer and move it behind your frame.
Open flower bunch 2 and copy and paste into your canvas, resize image to 60% (Image>Resize – make sure all layers box unticked) and move to sit in the inner center of the bottom of your frame.
Apply drop shadow.
Open glitterspray (silver) and copy and paste to your canvas. Resize by 75% and place to left edge of your frame over your rectangles. Apply drop shadow.
Open cookie to go – Blossom 9 and copy and paste to your canvas. Resize to 40% and place her on top of your flowers, position her bottom so it looks as though she is sitting in the flowers. Apply drop shadow.
Open blingbutterfly 1 and copy and paste to canvas. Mirror image (Image>mirror) Resize to 50% and free rotate (Image>Free rotate) left 20%. Position above the frame next to your top rectangle. Apply Dropshadow.
Open dragonfly 2, copy and paste to canvas, mirror image and resize to 50%. Position on the bottom of your rectangles. Apply Dropshadow.
Open stitched flower 4 – resize by 50% and position the middle of the flower on the second rectangle left edge. Right click > arrange and move down until it is below this layer. Right click > duplicate then we want to flip it. Image > flip. Duplicate again and center it between the two flowers. Apply drop shadows to all 3 flowers.
Open stitched flower 2, copy and paste into canvas.(it will not show up as we had worked on lower layers, so you can find it highlighted in your layers display to your right of screen, right click and bring to top) Resize to 50% and position in the middle of your 2 top flowers. Move it down below your rectangle, but above the other flowers. Duplicate this flower then flip. Add drop shadows.
Add your text in whichever colour or font as you wish. Apply Dropshadow.
Merge layers – layers> merge> merge visible and if you wish you can apply a final dropshadow and resize to one you wish to use.
Kit used is my new PTU tagger kit called "Get Fresh" and you can purchase it here.
The cookie used is made by Wishing On a Starr and is included in the kit. These are PTU and you find them in store here.
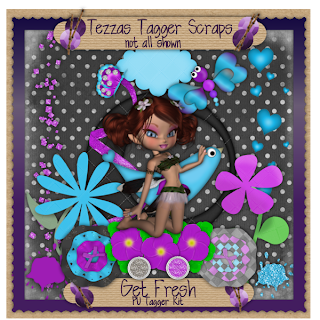
Here's the kit preview.
To start:
Open a transparent canvas 800 x 800 pixels.
Select your elipse tool – circle - width 10
Open Bg 23 and set as your foreground and background texture at scale 100%
Draw out your circle and center it.
Convert layer to raster layer
Select your rectangle tool – width 10
Open Bg 17 and set as your foreground and background texture at scale 50%
Draw out your rectangle approx 150 pixels wide and 700 pixels height (if you have your rulings set on your screen, if not, just estimate)
With your tool on the top left corner, drag the marker down until you get a nice rounded corner.
Convert to raster layer.
Place on top of your circle to the left showing some edge of the circle.
Apply drop shadow – mine is set as black, 75% opacity, blur 10, vertical and horizontal both 5 (I will keep these as my settings, you can set your shadows as you like)
Open Bg 7 and draw out another rectangle with the foreground and background set at 30% as above, but half the width and shorter in length.
Convert to raster layer. Place on top of your first rectangle. Apply drop shadow.
Open Bg 16 and repeat the process with foreground and background set at 75%.
Open frame 4, copy (ctrl c) and paste (ctrl v) into the center of your circle – moving it to the right so it’s overlapping your top rectangle, apply drop shadow.
Select your square tool, Open Bg 20 set as foreground and background at 75% and draw out a square the size of the inside of the frame.
Convert to raster layer and move it behind your frame.
Open flower bunch 2 and copy and paste into your canvas, resize image to 60% (Image>Resize – make sure all layers box unticked) and move to sit in the inner center of the bottom of your frame.
Apply drop shadow.
Open glitterspray (silver) and copy and paste to your canvas. Resize by 75% and place to left edge of your frame over your rectangles. Apply drop shadow.
Open cookie to go – Blossom 9 and copy and paste to your canvas. Resize to 40% and place her on top of your flowers, position her bottom so it looks as though she is sitting in the flowers. Apply drop shadow.
Open blingbutterfly 1 and copy and paste to canvas. Mirror image (Image>mirror) Resize to 50% and free rotate (Image>Free rotate) left 20%. Position above the frame next to your top rectangle. Apply Dropshadow.
Open dragonfly 2, copy and paste to canvas, mirror image and resize to 50%. Position on the bottom of your rectangles. Apply Dropshadow.
Open stitched flower 4 – resize by 50% and position the middle of the flower on the second rectangle left edge. Right click > arrange and move down until it is below this layer. Right click > duplicate then we want to flip it. Image > flip. Duplicate again and center it between the two flowers. Apply drop shadows to all 3 flowers.
Open stitched flower 2, copy and paste into canvas.(it will not show up as we had worked on lower layers, so you can find it highlighted in your layers display to your right of screen, right click and bring to top) Resize to 50% and position in the middle of your 2 top flowers. Move it down below your rectangle, but above the other flowers. Duplicate this flower then flip. Add drop shadows.
Add your text in whichever colour or font as you wish. Apply Dropshadow.
Merge layers – layers> merge> merge visible and if you wish you can apply a final dropshadow and resize to one you wish to use.
Kit used is my new PTU tagger kit called "Get Fresh" and you can purchase it here.
The cookie used is made by Wishing On a Starr and is included in the kit. These are PTU and you find them in store here.
Here's the kit preview.
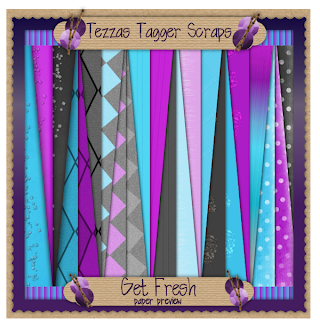
 and the paper preview
 Thanks for stopping by.
 To start:
Open a transparent canvas 800 x 800 pixels.
Select your elipse tool – circle - width 10
Open Bg 23 and set as your foreground and background texture at scale 100%
Draw out your circle and center it.
Convert layer to raster layer
Select your rectangle tool – width 10
Open Bg 17 and set as your foreground and background texture at scale 50%
Draw out your rectangle approx 150 pixels wide and 700 pixels height (if you have your rulings set on your screen, if not, just estimate)
With your tool on the top left corner, drag the marker down until you get a nice rounded corner.
Convert to raster layer.
Place on top of your circle to the left showing some edge of the circle.
Apply drop shadow – mine is set as black, 75% opacity, blur 10, vertical and horizontal both 5 (I will keep these as my settings, you can set your shadows as you like)
Open Bg 7 and draw out another rectangle with the foreground and background set at 30% as above, but half the width and shorter in length.
Convert to raster layer. Place on top of your first rectangle. Apply drop shadow.
Open Bg 16 and repeat the process with foreground and background set at 75%.
Open frame 4, copy (ctrl c) and paste (ctrl v) into the center of your circle – moving it to the right so it’s overlapping your top rectangle, apply drop shadow.
Select your square tool, Open Bg 20 set as foreground and background at 75% and draw out a square the size of the inside of the frame.
Convert to raster layer and move it behind your frame.
Open flower bunch 2 and copy and paste into your canvas, resize image to 60% (Image>Resize – make sure all layers box unticked) and move to sit in the inner center of the bottom of your frame.
Apply drop shadow.
Open glitterspray (silver) and copy and paste to your canvas. Resize by 75% and place to left edge of your frame over your rectangles. Apply drop shadow.
Open cookie to go – Blossom 9 and copy and paste to your canvas. Resize to 40% and place her on top of your flowers, position her bottom so it looks as though she is sitting in the flowers. Apply drop shadow.
Open blingbutterfly 1 and copy and paste to canvas. Mirror image (Image>mirror) Resize to 50% and free rotate (Image>Free rotate) left 20%. Position above the frame next to your top rectangle. Apply Dropshadow.
Open dragonfly 2, copy and paste to canvas, mirror image and resize to 50%. Position on the bottom of your rectangles. Apply Dropshadow.
Open stitched flower 4 – resize by 50% and position the middle of the flower on the second rectangle left edge. Right click > arrange and move down until it is below this layer. Right click > duplicate then we want to flip it. Image > flip. Duplicate again and center it between the two flowers. Apply drop shadows to all 3 flowers.
Open stitched flower 2, copy and paste into canvas.(it will not show up as we had worked on lower layers, so you can find it highlighted in your layers display to your right of screen, right click and bring to top) Resize to 50% and position in the middle of your 2 top flowers. Move it down below your rectangle, but above the other flowers. Duplicate this flower then flip. Add drop shadows.
Add your text in whichever colour or font as you wish. Apply Dropshadow.
Merge layers – layers> merge> merge visible and if you wish you can apply a final dropshadow and resize to one you wish to use.
Kit used is my new PTU tagger kit called "Get Fresh" and you can purchase it here.
The cookie used is made by Wishing On a Starr and is included in the kit. These are PTU and you find them in store here.
Here's the kit preview.
To start:
Open a transparent canvas 800 x 800 pixels.
Select your elipse tool – circle - width 10
Open Bg 23 and set as your foreground and background texture at scale 100%
Draw out your circle and center it.
Convert layer to raster layer
Select your rectangle tool – width 10
Open Bg 17 and set as your foreground and background texture at scale 50%
Draw out your rectangle approx 150 pixels wide and 700 pixels height (if you have your rulings set on your screen, if not, just estimate)
With your tool on the top left corner, drag the marker down until you get a nice rounded corner.
Convert to raster layer.
Place on top of your circle to the left showing some edge of the circle.
Apply drop shadow – mine is set as black, 75% opacity, blur 10, vertical and horizontal both 5 (I will keep these as my settings, you can set your shadows as you like)
Open Bg 7 and draw out another rectangle with the foreground and background set at 30% as above, but half the width and shorter in length.
Convert to raster layer. Place on top of your first rectangle. Apply drop shadow.
Open Bg 16 and repeat the process with foreground and background set at 75%.
Open frame 4, copy (ctrl c) and paste (ctrl v) into the center of your circle – moving it to the right so it’s overlapping your top rectangle, apply drop shadow.
Select your square tool, Open Bg 20 set as foreground and background at 75% and draw out a square the size of the inside of the frame.
Convert to raster layer and move it behind your frame.
Open flower bunch 2 and copy and paste into your canvas, resize image to 60% (Image>Resize – make sure all layers box unticked) and move to sit in the inner center of the bottom of your frame.
Apply drop shadow.
Open glitterspray (silver) and copy and paste to your canvas. Resize by 75% and place to left edge of your frame over your rectangles. Apply drop shadow.
Open cookie to go – Blossom 9 and copy and paste to your canvas. Resize to 40% and place her on top of your flowers, position her bottom so it looks as though she is sitting in the flowers. Apply drop shadow.
Open blingbutterfly 1 and copy and paste to canvas. Mirror image (Image>mirror) Resize to 50% and free rotate (Image>Free rotate) left 20%. Position above the frame next to your top rectangle. Apply Dropshadow.
Open dragonfly 2, copy and paste to canvas, mirror image and resize to 50%. Position on the bottom of your rectangles. Apply Dropshadow.
Open stitched flower 4 – resize by 50% and position the middle of the flower on the second rectangle left edge. Right click > arrange and move down until it is below this layer. Right click > duplicate then we want to flip it. Image > flip. Duplicate again and center it between the two flowers. Apply drop shadows to all 3 flowers.
Open stitched flower 2, copy and paste into canvas.(it will not show up as we had worked on lower layers, so you can find it highlighted in your layers display to your right of screen, right click and bring to top) Resize to 50% and position in the middle of your 2 top flowers. Move it down below your rectangle, but above the other flowers. Duplicate this flower then flip. Add drop shadows.
Add your text in whichever colour or font as you wish. Apply Dropshadow.
Merge layers – layers> merge> merge visible and if you wish you can apply a final dropshadow and resize to one you wish to use.
Kit used is my new PTU tagger kit called "Get Fresh" and you can purchase it here.
The cookie used is made by Wishing On a Starr and is included in the kit. These are PTU and you find them in store here.
Here's the kit preview.
 and the paper preview
 Thanks for stopping by.
Subscribe to:
Post Comments
(Atom)


Just a quick note to let you know that a link to this post will be placed on CraftCrave today [17 Jul 12:00pm GMT]. Thanks, Maria
ReplyDelete