
about me

About Me

- Tezza
- Adelaide, Australia
- I am a fulltime Mum of 2 kids, I work part time and play with psp in my spare time. Ive been psp-ing now since 2007. I started with digital scrapbooking, then tagging in 2008, and designing in 2009. In 2010 I started writing scripts and found my calling (and addiction). You will find all kinds of freebies here on my blog, from tag/scrap templates, to kits and scripts. You can read my Terms Of Use by clicking the page up above too.. Thanks for taking the time to stop by.
blinkie

My Blinkie

i sell at

I Sell At


script test

I script test for


licenses

My Licenses





free sites

Free Sites


top sites

Top Sites

Showing posts with label Tag. Show all posts
Showing posts with label Tag. Show all posts
Wednesday, May 22, 2013
I have taken part in a collab to celebrate the boss's Birthday at TKO Scraps.
She has gone with the Jersey Girls theme and it is oh so girly!!
The Wonderful Bev of HorsePlay's Pasture tutorials has gone and tagged and tuted
10 - yes 10 tag tutorials from this collab!
You can find this awesomely girly collab in store, it is in 3 parts, Commercial Use, Tagger Size and Full size.
You can see and purchase them here.
Here is my part of the collab.

and here is the tag created with my part.
You can click the tag below to take you to Bev's blog for the tutorial.
Enjoy the collab and have fun tagging!!


Co-Owner of
Proud Designer at
Exclusive Designer at
Thursday, February 21, 2013
Isnt this tag Awesome!! This was created for me by Jeannine of Funky Sweet Designs.
You can view the tutorial to create this tag here.
She has also created some share tags too, which you can snag here.
Thank you so much Jeannine for this awesome tag!!

here is the preview of the kit she used.
Cooking with love, comes in both tagger and scrap sizes.

My freebies for you are these Dragonflies.
Another early creation of mine which Im retiring. Its amazing going back and seeing how much my designs have changed over the last couple of years - for the better, lol.
There are 2 downloads for these dragonflies,
you can grab the scripts here
and the templates here
These are CU ok, not for resale.
Please do not share, instead send your friends here to download.
I hope you like them and can use them.

Thank you for stopping by
Saturday, February 11, 2012
New in stores today is this Cutie Doll with her teddy. She is so cute and my favourite so far.
She is on sale 50% off!
 Thank you for stopping by

For more information on her click my store blinkies to the left.
 Black widow tutorials has written a tutorial using my "Cupcakes and Cocktails" tagger kit.
 Black widow tutorials has written a tutorial using my "Cupcakes and Cocktails" tagger kit.
Here is the kit she used, in stores.
 and here is the tag she created with it.
 and here is the tag she created with it.
Thanks so much hun for the awesome tag!
If you want to see the tutorial and have a go,click the tag below and it will take you there.
Thank you for stopping by
Tuesday, August 16, 2011
I have 2 tutorials to share with you today from my Gloriously Green kit.
You can find this kit in stores by clicking the blinkies to the left.
Here is the kit used.
 Here is the tutorial and tag made for me by Sharon on Sharon's Tutorials
You can find her tutorial here.
 Here is the tutorial and Tag made for me by Bev of Horseplay's pasture tutorials.
You can find Bev and the tutorial here.
 Thanks so much girls for 2 awesome tags.
Thank you too for stopping by. :)

 Here is the tutorial and tag made for me by Sharon on Sharon's Tutorials
You can find her tutorial here.
 Here is the tutorial and Tag made for me by Bev of Horseplay's pasture tutorials.
You can find Bev and the tutorial here.
 Thanks so much girls for 2 awesome tags.
Thank you too for stopping by. :)
Monday, June 20, 2011
I would like to say a BIG Thank you to Sharon of Sharons Tutorials for these 3 awesome tags she has tuted with my Charity kit I have for sale for Noahs Ark Cause.
Here is a preview of the kit I have for sale for a low $2.50 with all sales going directly to Baby Noah.
 For more information on purchasing this kit, see here.
Now for Sharons Tags she has made with this kit.
Each tag is linked to her site for the tutorial, so feel free to click away and head over there. Check out her other awesome tutorials while you're there.


 Thanks again Sharon,
and thansk for stopping by :)
 For more information on purchasing this kit, see here.
Now for Sharons Tags she has made with this kit.
Each tag is linked to her site for the tutorial, so feel free to click away and head over there. Check out her other awesome tutorials while you're there.
Thanks again Sharon,
and thansk for stopping by :)
Saturday, June 11, 2011
I have designed a Full Size kit which I am selling for a great cause for Noahs Ark.
This kit is selling at a great low price with all sales going to Noah and his cause.
To find out more about this kit and Noah's cause, please read here.
I hope you can help.
Here is the kit preview.
 Bev from HorsePlay's Pasture Tutorials has made an awesome tag for me and a tutorial using my GnomeVille Gardens tagger kit.
Here is the kit she has used.
 and here is the tag.
She has done an awesome job as usual. Thank you so much Bev.
To see her blog and the tutorial, click the tag below.
 Thanks for stopping by :)
 Bev from HorsePlay's Pasture Tutorials has made an awesome tag for me and a tutorial using my GnomeVille Gardens tagger kit.
Here is the kit she has used.
 and here is the tag.
She has done an awesome job as usual. Thank you so much Bev.
To see her blog and the tutorial, click the tag below.
Thanks for stopping by :)
Thursday, April 14, 2011
It's Thrifty Thursday at Butterfly Blush! My products are all on sale starting from 99 cents.
If you've had your eye on products, now is the time to grab them!
Click the ad below to head to my store.
 Onto the tutorial, Using my 'Lil Bit Patchy kit below, Black Widow Tutorials has created a tag for me and a tutorial for you to take.
 and here's the tag.
You can check out the tutorial by heading to her blog.
Just click the tag below.
Have fun!
 Thanks for stopping by.
Onto the tutorial, Using my 'Lil Bit Patchy kit below, Black Widow Tutorials has created a tag for me and a tutorial for you to take.
 and here's the tag.
You can check out the tutorial by heading to her blog.
Just click the tag below.
Have fun!
Thanks for stopping by.
Monday, April 11, 2011
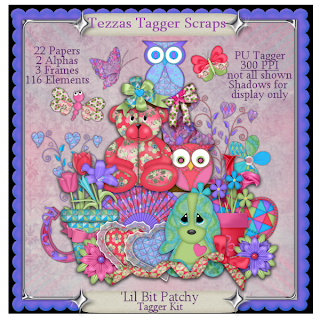
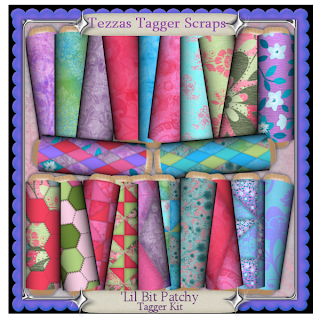
I have added a new tagger kit in stores today.
This kit is designed with my patchwork products and called 'Lil Bit Patchy.
You can find this in Butterfly Blush and Treasured Scraps for 50% off for the month of April.
 Using my kit I have created a tag tutorial for you.
I dont do tutorials very often so I hope this is easy for you to follow.
Here's the tag and tutorial:
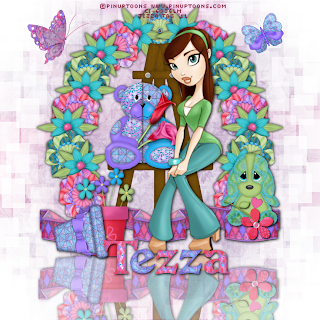 I have written this tutorial using psp X2
This is my creation and any resemblance to any other tutorial is not intended.
I have written this assuming you have a knowledge of paint shop pro.
You do not have to follow this tutorial precisely, feel free to use it as a guide and personalise your own tag if you wish.
In this tutorial I have used my own tagger kit 'Lil Bit Patchy - you can find it in my stores, click the blinkies to the left to go there.
I have also used my patchwork masks in stores.
Tube of my choice is by ©PinUpToons and is a PTU licensed tube you can find here.
To start
Open an 800x800 canvas
Using a paper of your choice, flood fill it to your canvas.
Next load a mask of your choice.
Layers > load/save mask > load mask from disk > load
then merge your group
layers > merge > merge group
Open and copy & paste the easel into the canvas, this will be used as your centre. Add your choice of drop shadow.
Open and paste a folded ribbon of your choice, then resize to 75% and place at the bottom of the easel. Add your choice of drop shadow.
Open your first flower of choice, I have used velvet flower 2,copy & paste, resize 50% and place at the top of the easel, add drop shadow and arrange the layer below the easel.
Open your third flower of choice, I have used flower 5,copy & paste, resize to 45% and place to one side of the easel, below the first flower. Add your drop shadow.Then duplicate the flower and mirror image.
right click > duplicate> Image > mirror.
Open your third flower of choice, I have used velvet flower 1,copy & paste, resize 50% and place to one side of the easel, below the second flower. Add your drop shadow.
Then duplicate the flower and mirror image.
Continue duplicating and arranging your flowers until you have a flower arch.
Open your patchwork animal of choice, I have used Patchwork Bear 2, copy & paste, resize to your desired size, add drop shadow and place on the bottom ledge of the easel.
Open your second patchwork animal of choice, I have used puppylove 2,copy & paste, resize to your desired size, add drop shadow, and place on the side of the folded ribbon, arrange the layer above the ribbon.
Continue adding your desired elements to the tag, flowerpots, flowers etc and resizing and adding drop shadows to your desire.
Add your choice of tube to sit on the easel with your patchwork animal, I have used a PTU Tube by ©PinUpToons, this tube needs a license to use.
Next, in your layer palette, click your background paper to turn off the visibility by clicking the eye. Then back to your canvas, click the pan tool > right click on canvas > copy merged >
then right click again > paste as new layer.
With this layer we want to flip it so go to Image > flip
Move this merged layer down to the bottom of the tag so the edges meet up.
In the layer palette, right click this layer > properties > then adjust the opacity to 50 > ok.
Click your visibility again on your background layer to turn it back on.
Now add your correct licensing number and details to the tag and your name in your font of choice
or use the included alphas with your own drop shadows.
Now you can resize the tag to your choice of size and save as png file.
That's it, hope you enjoyed this tutorial, and feel free to email me any of your creations for me to show off (or not, lol)
Thank you.

 Using my kit I have created a tag tutorial for you.
I dont do tutorials very often so I hope this is easy for you to follow.
Here's the tag and tutorial:
 I have written this tutorial using psp X2
This is my creation and any resemblance to any other tutorial is not intended.
I have written this assuming you have a knowledge of paint shop pro.
You do not have to follow this tutorial precisely, feel free to use it as a guide and personalise your own tag if you wish.
In this tutorial I have used my own tagger kit 'Lil Bit Patchy - you can find it in my stores, click the blinkies to the left to go there.
I have also used my patchwork masks in stores.
Tube of my choice is by ©PinUpToons and is a PTU licensed tube you can find here.
To start
Open an 800x800 canvas
Using a paper of your choice, flood fill it to your canvas.
Next load a mask of your choice.
Layers > load/save mask > load mask from disk > load
then merge your group
layers > merge > merge group
Open and copy & paste the easel into the canvas, this will be used as your centre. Add your choice of drop shadow.
Open and paste a folded ribbon of your choice, then resize to 75% and place at the bottom of the easel. Add your choice of drop shadow.
Open your first flower of choice, I have used velvet flower 2,copy & paste, resize 50% and place at the top of the easel, add drop shadow and arrange the layer below the easel.
Open your third flower of choice, I have used flower 5,copy & paste, resize to 45% and place to one side of the easel, below the first flower. Add your drop shadow.Then duplicate the flower and mirror image.
right click > duplicate> Image > mirror.
Open your third flower of choice, I have used velvet flower 1,copy & paste, resize 50% and place to one side of the easel, below the second flower. Add your drop shadow.
Then duplicate the flower and mirror image.
Continue duplicating and arranging your flowers until you have a flower arch.
Open your patchwork animal of choice, I have used Patchwork Bear 2, copy & paste, resize to your desired size, add drop shadow and place on the bottom ledge of the easel.
Open your second patchwork animal of choice, I have used puppylove 2,copy & paste, resize to your desired size, add drop shadow, and place on the side of the folded ribbon, arrange the layer above the ribbon.
Continue adding your desired elements to the tag, flowerpots, flowers etc and resizing and adding drop shadows to your desire.
Add your choice of tube to sit on the easel with your patchwork animal, I have used a PTU Tube by ©PinUpToons, this tube needs a license to use.
Next, in your layer palette, click your background paper to turn off the visibility by clicking the eye. Then back to your canvas, click the pan tool > right click on canvas > copy merged >
then right click again > paste as new layer.
With this layer we want to flip it so go to Image > flip
Move this merged layer down to the bottom of the tag so the edges meet up.
In the layer palette, right click this layer > properties > then adjust the opacity to 50 > ok.
Click your visibility again on your background layer to turn it back on.
Now add your correct licensing number and details to the tag and your name in your font of choice
or use the included alphas with your own drop shadows.
Now you can resize the tag to your choice of size and save as png file.
That's it, hope you enjoyed this tutorial, and feel free to email me any of your creations for me to show off (or not, lol)
Thank you.
I have just finished a new tagger kit that Im currently packing up and getting ready to put into stores.
Just for a little tease, here's a sneak peek :) I enjoyed designing this kit and had to stop myself from overloading it, lol.
 I have a tag to show off that was made for me by Midnite Kiss Tutorials using my "Spring Into Easter" tagger kit below.
 and here it is, isnt it great. The tutorial on this can be found by clicking on the tag below. I hope you enjoy her blog and this tutorial.
Thanks so much Les for using my kit.
 Thanks for stopping by.
 I have a tag to show off that was made for me by Midnite Kiss Tutorials using my "Spring Into Easter" tagger kit below.
 and here it is, isnt it great. The tutorial on this can be found by clicking on the tag below. I hope you enjoy her blog and this tutorial.
Thanks so much Les for using my kit.
Thanks for stopping by.
Sunday, March 20, 2011
New items have gone in stores today.
Patchwork Flower Duo script and psd template and a Banner Ribbon script and psd template.
You can find these on a silly special in store at cuforcu.com for 99 cents each.
I have my store on sale for 99 cents until midnight march 20th and all my combo packs on sale for 50% off.
and now onto a freebie.
I havent made a template in .................a while, so with my fixation on patchwork right now, I have made this template (not quite patchwork) for you.
You can get this in either tagger size or scrap size - or both.
Feel free to use this for your tags or layouts, please no CU on these.
Both sizes have a psd and psp layered template.
 Download scrap size here.
Tagger size here.
Thanks for stopping by.
 In Stock: 1000 ... more info | Banner Ribbon Script Model: Tezza Manufacturer: Tezzas Tagger Scraps Price: $3.00 Sale: $0.99 Save: 67% off Weight: 0lbs Date Added: Saturday 19 March, 2011 | |
| This script will make you a banner ribbon to coordinate to your kits. Just add your text on the plaque and its a perfect addition to your projects. ... more info | ||
 In Stock: 1000 ... more info | Banner Ribbon Template Model: Tezza Manufacturer: Tezzas Tagger Scraps Price: $3.00 Sale: $0.99 Save: 67% off Weight: 0lbs Date Added: Saturday 19 March, 2011 | |
| This banner ribbon template is in a psd layered file ready for you to colourise. Designed at 300ppi its full size measuring 8x3 inches. Coordinate to ... more info | ||
 In Stock: 1000 ... more info | Patchwork Flower Duo Script Model: Tezza Manufacturer: Tezzas Tagger Scraps Price: $3.50 Sale: $0.99 Save: 72% off Weight: 0lbs Date Added: Saturday 19 March, 2011 | |
| This script duo will make you 2 patchwork flowers to coordinate with my other patchwork products. The script will prompt you at the start of both ... more info | ||
 In Stock: 1000 ... more info | Patchwork Flower Duo Template Model: Tezza Manufacturer: Tezzas Tagger Scraps Price: $3.50 Sale: $0.99 Save: 72% off Weight: 0lbs Date Added: Saturday 19 March, 2011 | |
| This template duo is of 2 patchwork flowers to coordinate with my other patchwork products. You will get 2 psd layered files of 2 different flowers, ... more info | ||
 Download scrap size here.
Tagger size here.
Thanks for stopping by.
Tuesday, February 15, 2011
Bev from HorsePlay's Pastures has created a gorgeous tag and tutorial using my new "A Love Thing" tagger kit.
Thank you so much Bev, I love it.
Click the tag below to head to her blog and check out the tut.
 The kit she used is this one below, in stores now. Currently on sale 40% OFF until February 28.
 Thanks for stopping by.
The kit she used is this one below, in stores now. Currently on sale 40% OFF until February 28.
 Thanks for stopping by.
Sunday, February 13, 2011
In time for Valentines Day, I have added in stores and New psp script and psd template of a fluffy heart. Cu4Cu ok these.
These are a great addition to your valentine projects.

 and a new kit in stores at Butterfly Blush and Treasured Scraps is
"A Love Thing" tagger kit.
Designed in a range of Pink colours with a splash of silver and gold thrown in.
All these are currently 40% OFF in stores, so grab them while they are discounted.
 and showing off an awesome tutorial made with my new kit.
Black Widow Tutorials has done a great job with this tag and tut and I love it.
If you want to do her tut, click the tag below to head over.
Check out her other tuts while you're there.
Thanks hun for my tag♥
 Thanks for stopping by.

 and a new kit in stores at Butterfly Blush and Treasured Scraps is
"A Love Thing" tagger kit.
Designed in a range of Pink colours with a splash of silver and gold thrown in.
All these are currently 40% OFF in stores, so grab them while they are discounted.
 and showing off an awesome tutorial made with my new kit.
Black Widow Tutorials has done a great job with this tag and tut and I love it.
If you want to do her tut, click the tag below to head over.
Check out her other tuts while you're there.
Thanks hun for my tag♥
Thanks for stopping by.
Wednesday, January 5, 2011
Thank you so much to Black Widow Tutorials for this awesome tag.
She has created this using my "Lolly Factory" kit which is available in stores for 55% off at the moment. Just click a store blinkie to the right of my blog.
If you want to check out the tutorial, you can find it on her blog here.
 and this is the preview of the kit and the papers in stores.

 Thanks for stopping by.
 and this is the preview of the kit and the papers in stores.
Thanks for stopping by.
Subscribe to:
Posts
(Atom)